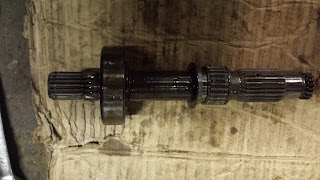
According to the shop manual, repairing the starter clutch that is the source of this problem requires splitting the cases - a massive job. However, it can be done by removing quite a bit less, and keeping the engine in the frame. There are some good tutorials about this at other sites, but here are a few pictures as well to aid you in your efforts.
Basic steps:
1. Drain the oil
2. Remove clutch cover
3. Remove oil pan
4. Remove clutch basket
Here is what you should be looking at with everything necessary removed from underneath the clutch cover. Notice the primary shaft has had all the gears removed, and the bearing retainer unbolted and removed (the retainer is held in by the 10mm bolts)
Above is the primary shaft in process of removal. This may feel like it is impossible to remove at first, but lots of patient wiggling and it will eventually break free and start to slide out.
This is the primary shaft removed from the case. Free at last!
Looking through the hole left from where the primary shaft and bearing were seated, you should be able to see the starter gear linked to the starter clutch, and the chain going up and towards the rear to link the starter itself to the primary shaft. Look for the torx-head bolts behind the holes in the starter gear. Those holes, once properly aligned, will allow you to just barely fit a torx socket onto the bolt, one at a time. Engage the transmission into top gear and turn the rear wheel to slowly move the engine and get each bolt to the "5 o'clock" position when looking through the primary gear hole.
It can be very difficult to actually get the starter clutch to slip out past the starter gear...lots of prying with soft tools will aid your cause (wooden wedges are great). Once you have it out, spend the money to replace ALL the disposable parts - springs, caps and rollers. Consider getting a good used starter clutch housing as well if yours looks beat up. It can be surprising how little damage can cause the clutch to cease functioning.
Finally, it can be difficult to get the torx bolts into the holes once you have the starter clutch and starter gear mated and reinstalled. Again, wood blocks are your friend. Pull the starter clutch and gear apart just enough to slip the torx bolt in, but not too much so that the rollers or springs fall out. And remember, once you have the starter clutch and primary shaft back together, you can test by pushing the starter button for just a second to make sure it engages...so that you don't waste your time putting the whole bike back together and then realize you didn't do it right. Good luck!


