Friday, December 25, 2015

Our Favorite Two Strokes of 2015

Vintage two-stroke motorcycles are generally smokey, noisy, and terribly unreliable. A pain to work on but oh-so-fun to ride...unless you need to stop, that is. Front and rear drum brakes as standard equipment don't make for the most confident of braking. But, with very low weight and the increased horsepower of the two-stroke engine, they feel deceptively fast, and the acceleration can be a lot of fun. Here are our favorites that came in the shop this past year:

1970 Yamaha CS3 (the predecessor to the legendary RD series) - 198cc, kick and electric start, and supposedly a top speed of 80mph.

1967 Yamaha YR1 - one of the prettiest bikes we've ever had in the shop, this was a genuine cafe racer, and was designed to do the ton right out of the factory.

1973 Suzuki GT185 - definitely the smoothest-sounding vintage two-stroke we've had, very light and fast. A race between this and the CS3 would be interesting. And did you spot the Yamaha AT3 right behind it?

Thursday, June 4, 2015

CB650 SOHC Starter Clutch Removal and Installation

One of the dreaded (and unfortunately common) problems on the SOHC CB650 is failure of the starter clutch. This engine is most commonly seen in the CB650 Custom, but was also used in the 1982 CB650 Nighthawk. The symptoms start out intermittently, with the starter taking a second or two of spinning once you push the starter button before it actually engages with the motor, and will get worse over time until it doesn't engage at all - you'll hear a loud whirring as the starter spins very fast because there is no resistance, and the motor doesn't get turned, so your bike doesn't run.

According to the shop manual, repairing the starter clutch that is the source of this problem requires splitting the cases - a massive job. However, it can be done by removing quite a bit less, and keeping the engine in the frame. There are some good tutorials about this at other sites, but here are a few pictures as well to aid you in your efforts.

Basic steps:
1. Drain the oil
2. Remove clutch cover
3. Remove oil pan
4. Remove clutch basket


Here is what you should be looking at with everything necessary removed from underneath the clutch cover. Notice the primary shaft has had all the gears removed, and the bearing retainer unbolted and removed (the retainer is held in by the 10mm bolts)

Above is the primary shaft in process of removal. This may feel like it is impossible to remove at first, but lots of patient wiggling and it will eventually break free and start to slide out.

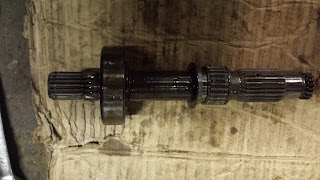
This is the primary shaft removed from the case. Free at last!

 Looking through the hole left from where the primary shaft and bearing were seated, you should be able to see the starter gear linked to the starter clutch, and the chain going up and towards the rear to link the starter itself to the primary shaft. Look for the torx-head bolts behind the holes in the starter gear. Those holes, once properly aligned, will allow you to just barely fit a torx socket onto the bolt, one at a time. Engage the transmission into top gear and turn the rear wheel to slowly move the engine and get each bolt to the "5 o'clock" position when looking through the primary gear hole.

 We found the best way to remove each bolt was using a torx socket with a 1/4" drive socket wrench, going in from the oil pan to loosen each bolt when it was in the "5 o'clock" position relative to the right engine cover. As mentioned earlier, engage the transmission and turn the rear wheel to get the starter gear holes to line up correctly to give you access to each bolt.

It can be very difficult to actually get the starter clutch to slip out past the starter gear...lots of prying with soft tools will aid your cause (wooden wedges are great). Once you have it out, spend the money to replace ALL the disposable parts - springs, caps and rollers. Consider getting a good used starter clutch housing as well if yours looks beat up. It can be surprising how little damage can cause the clutch to cease functioning.

Finally, it can be difficult to get the torx bolts into the holes once you have the starter clutch and starter gear mated and reinstalled. Again, wood blocks are your friend. Pull the starter clutch and gear apart just enough to slip the torx bolt in, but not too much so that the rollers or springs fall out. And remember, once you have the starter clutch and primary shaft back together, you can test by pushing the starter button for just a second to make sure it engages...so that you don't waste your time putting the whole bike back together and then realize you didn't do it right. Good luck!

Friday, May 29, 2015

Pop Quiz

Here are some examples of difficult to notice damage to parts that can cause big problems. Look at the photos and see if you can spot the problems with each component. Answers are below. Good luck!

EXHIBIT A
 
EXHIBIT B

EXHIBIT C

EXHIBIT D


A. See the crack on this ignition coil? That's bad...if you are still getting a spark, the coil will imminently fail. This is especially a problem on bikes with the coils mounted very close to a hot engine.


B. See the crack on the overflow tube? That caused a fuel leak that can easily be confused with a bad float valve. Sometimes they can be soldered to seal the leak, otherwise you need to replace the float bowl.

C. Did you spot all the damaged teeth in these transmission gears? There are 5 that are especially bad, and a bonus sixth tooth that is marginal. The bike sounded terrible when running and couldn't shift properly.

D. This starter clutch has been working too hard...the springs are about to break through the outside, which is what has caused the hole that accesses them from the outside to become enlarged. This represents enough damage to keep the starter from engaging the motor at al.

Thursday, March 5, 2015

What We Did This Winter

So, Spring is (hopefully) around the corner, and we're back in the shop getting bikes tuned up for another year of riding. As we dream of warm weather, here's a look back at our adventures this winter:

Geoffrey went to California and worked on some motorcycles with friends from the shop where he learned the trade:

His first project was a 1981 Suzuki GS550 with an engine that snapped it's cam chain. The cases were damaged from the subsequent destruction, so we did an engine swap from a bike with no title that was at the shop.
Untitled donor bike for our engine swap
1981 GS550 - the finished project


Next up was a 1997 Suzuki TL1000 - it had problems with the fuel injection system and another shop had given up on it. We found some incorrectly routed vacuum lines and adjusted the throttle position sensor and it was good to go. The bike is a beast, tons of torque and probably the fastest bike Geoffrey ever rode.


Next was a 1988 BMW K100. The bike didn't run great at first because of a seized choke mechanism. It also had the absolute most worn down rear brake pads of any bike we've ever seen - the pads were gone and the wear was halfway through the metal backing. Miraculously the rotor was salvageable after some heavy sanding. Geoffrey also did a rear tire change and used the opportunity to perform the infamous final drive spine lube. Now it's ready for another 20,000 miles!


Finally, we pulled out a 1984 Honda XR600 that had been sitting outside for a year. It had an aftermarket flat slide single-carburetor setup, but the carb was totally gunked! The choke plunger was completely seized inside the carb body. After soaking it overnight in the legendary Yamalube carburetor cleaner, it was clean as a whistle. Geoffrey tried futilely to start up this kickstart-only bike, then his old boss showed him a few tricks and it fired right up. It's ready for Baja now!
Single-carb and aftermarket manifold
Gunked Carburetor
Choke finally free!

1984 Honda XL600 - legendary dual sport amidst resurrection

Then Geoffrey made a visit to San Jose where he helped out Laurent (a mechanic who has also done some work at Slagheap Cycles) to get a 2005 Ninja 250R running right. The bike had a weird problem: even after thorough carburetor cleaning, it still wouldn't idle properly, on an engine with only 6600 miles that started right up and had plenty of power. After eliminating everything else we could think of, we performed a valve tappet adjustment and found that, even with so few miles on the engine, more than half of the clearances were significantly tighter than spec. So, word of warning, those valve clearances need to be adjusted often! After doing the adjustment and putting everything back together, the bike idled and ran great.